Pages

***10% of all proceeds are donated to The National Institute of Mental Health and Kansas City Public Television through my Jack of All Trades Crafter Etsy Shop.

***Donations made to Birth Without Borders and Little Dresses for Africa through my Baby And Bloomers Etsy Shop.

Tuesday, January 31, 2012

Kanzashi Flower Pins!


I've put up some new items in my Etsy Shop. I have fallen in love with these flower pins. I'm making a variety of pins from my favorite fabrics. Enjoy!

Monday, January 30, 2012

Craft Apron!

I do a lot of crafting and have found I use my hand towel quite often. So, I decided to create an apron made from a towel (you guessed it!). It took me 10 minutes to make it. All I did was take a hand towel and stitched cording on two of the short ends (pick a short side that will be where the cording goes around your neck). Then, I stitched cording about where my waist was.


You could easily make your apron pretty with the variety of towels they sell today and use ribbon or scrap fabric to create your straps. I was being economical with what I had on hand and the towel only cost me about $3. What's nice about this apron is that when I decoupage, and constantly washing my hands, I can just use my apron instead of my nice hand towels. I also get glue on my apron, not on my clothes. Let me know if you have any questions.


Materials needed:
hand towel
cording
thread
sewing machine


Time: 10 minutes

Friday, January 27, 2012

Picnic Time!

Kansas has been having a mild winter so my husband and I decided to go for a hike with our babies. As we hiked we decided that this weekend we would make a day of it and pack a picnic. So, I decided to make a little holder for the silverwear. My goal for my diy crafts is that they are quick and easy to make. You can always make them fancier. I took a piece of my favorite fabric and went from there. Enjoy!


Fold over 1/4" then another 1/4"
Materials needed:
Ribbon


Two 4.5" x 11" rectangular pieces of fabric (or use my pattern in "My Additions" section)


sewing machine
thread
pinking shears (for finishing the ribbon, or you can always sew over the ends)


Directions
1. Measure (or use pattern) and cut 2 rectangles of your fabric.
2. On one side of each of your pieces of fabric, fold over 1/4 inch, then another 1/4 inch and edgestitch.
3. Then, with right sides together, sew the three sides, being sure to leave the top (where you edgestitched) open.
4. Turn and iron.
5. Cut ribbon to desired length, then pin in desired location. Topstitch around the fabric, being sure to accurately stitch over the ribbon (I accidently tore part of the ribbon).
6. Finish off the ribbon ends using pinking shears or desired method.


Voila! You now can go on a picnic!

Thursday, January 26, 2012

Fabric!

This was the photo I uploaded to Spoonflower.
I got the idea to use Spoonflower to create my own fabric from a favorite blog of mine. All I did was upload the photo and edit it in Picnik (you choose to edit once you've uploaded your photo). You can check out my Buffalo fabric I created at Spoonflower.


Materials needed:

favorite photo
computer
Spoonflower account (free and you can use your Facebook login)

Directions:

1. Go to Spoonflower (create a login) and upload your image. (Clikc on custom fabric)
2. You can adjust the size so that more or less of your design is in your fabric. You can also edit it it Picnik. I made mine look more vintage and think that it could make a create table cloth. Just play around and see what you like.
3. Save your work.
4. Order your test fabric to check for color and then order desired amount. :)

Copyright issues
It's your fabric because it's your original idea! Spoonflower lets you retain rights to your design and they sell it.


Wednesday, January 25, 2012

How to make your own hot pads

I made myself a couple of hot pads from scrap fabric. You can make whatever size you like. 
Finished hot pad

Materials:
Scrap fabric
Scrap batting
thread, sewing machine
iron

Directions:
1. I stitched together scap fabric to make two 9" x 11" rectangular pieces. 
2. I then used scrap batting and layered it with the batting down, backside facing right side up, front side facing wrong side up. 
3. Then I stitched all around, leaving about a 1-2" opening for turning. 
4. I turned it right side out, pressed it, then topstitched all the way around, making sure that the opening was stitched closed. You can always slipstitch the opening closed too. 
5. Then, quilt as desired. 

I like to use hot pads to practice my machine quilting. It didn't take very long to do either. Enjoy!


Layer pieces for stitching.


Turn right side out.

Topstitching.


Monday, January 23, 2012

Pins & another quilt!


I'm a huge fan of IBC sewing pins. If you haven't used them, you need to. You can leave them in your fabric as you sew! I finished my son's quilt and am onto my daughter's and the pins have made the job a whole lot easier.


I picked this American Jane Panel when I was pregnant (not knowing I was having twins). (The receiving blanket quilt I'm also working on, but is much more complicated and won't be done anytime soon). My husband and I love the outdoors and camping, so I thought that this fabric was fitting for a boy or a girl. I made it more feminine with the cherry floral fabric border. It needs to be wider, so I think I'm going to add strips to the sides.

Sunday, January 22, 2012

A work in progress

I am working on quilts for my twins using their receiving blankets (they just turned one). I'm almost finished with my son's quilt. I bought border fabric, backing, and binding fabric from my local fabric store. I made a strip to cover the seam of where I stitched the two receiving blankets together and then tied these portions. I've decided I'm also going to tie on the border. Everything else is hand quilted.


Binding Fabric

Saturday, January 21, 2012

How to make your own banner image.

My banner has been driving me crazy because it didn't match my logo. So, I decided to make my own (which I didn't know how to do before). So, I'm including directions if you want to make your own image. You just need to know how to use Word. I've included pictures and directions below in case you may have trouble navigating (I did). You can easily take your favorite photos and use these instead of the AutoShape.

Materials needed:
logo or picture
computer
know how to navigate Microsoft Word

Directions:
1.Open up a word document. Change the page setup (go to "File," then "Page Setup," then click on the landscape orientation so that the document layout is wide.

Insert Auto Shape
2. Create an Auto Shape(Click on "Insert," scroll to "Picture," then click "Auto Shape," (choose rectangle).  Toolbars will pop up on your screen. Keep these open for use.


3. Adjust the size, making it wide. Double click the rectangle to change the layout (to behind text) and color (your choice). If you don't like the colors, you can use the palette. Click on "More Colors," and play around until you get the color you like.
Change Rectangle Color


4. Next, add a text box (from your formatting palette, or go to "Insert," then "Text Box"). Adjust the size so it is the same size as the rectangle auto shape. Add your text and play around with the size and font until it's what you like.


Insert Logo
5. Insert your logo so that it is on the left (or right, depending upon your preference) size of your rectangle. (Go to "Insert," then "Picture," then, "From File"). Adjust to where you want it to be. I had trouble with word letting me put the logo right on the rectangle, otherwise I would tell you how to do this. If you know, please leave a comment. :)


6. When you think you have finished
designing your banner, click on the top of your tool bar with the square and arrow.

7. Then click and select all items in your banner.


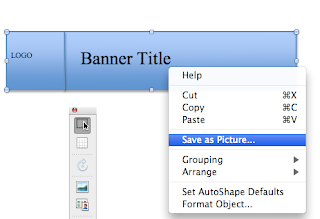
8. Select Group to group them together.

9. Then right click and save as a picture.


10. Title your file and save where your banner where you can find it.


11. You can use this banner just as it is. To make sure it fills the entire space you need to use a photo editing program. I use iPhoto and customize my crop to 760 x 100. (See pictures to right if you have iPhoto).


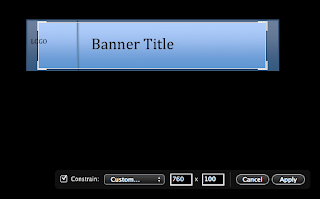
This is the perfect size for your object. If you realize that your rectangle is too large to crop and get the image you like, just go back, ungroup your banner, and then resize each part.


12. Upload your image, just as you did before for your banner.


Finished Scarf and Hat!


So, I finally finished my colourscape scarf and hat. I love this yarn. As I mentioned in earlier posts, I used the Rowan Folk book and Knitting Pure and Simple as my patterns. I modified the Knitting Pure and Simple pattern because my yarn was chunky, not bulky, and it worked (met the patterns guage but used much bigger needles).  Check out My Additions for the modifications. I knit in Camouflage (yarn I was going to make for a sweater). 


I hope you find these patterns easy and simple too! Remember to purchase them from your local yarn shop, if you can.

Friday, January 20, 2012

Blue Pins are Ready!

If you've been checking out my catalog or Etsy shop, you'll notice that I've added quite a few items in the last few days. I love the fabrics, so naturally I love the pins and really enjoyed making them. "Jack's Wood Pin," is more red than orange- don't think it really comes through the pictures and it is one of my favorites.
"Jack's Blue Pins"


"Jack's Big Pins"


Kaffe Fasset Fabric for the pin, Anna Maria Horner's fabric in the background. LOVE it!

Thursday, January 19, 2012

Paris!

I visited a couple of local scrapbooking stores today and picked up a couple of goodies. I've started a new set of pins. Check out the Scrapbook Page and Scrapbook Unique.

Wednesday, January 18, 2012

Jack's Big Pin

I love Anna Maria Horner's fabric, so I decided to make a large pin from one of her fabrics. All you do is follow the decoupage steps listed under my Hair Barrettes post. Instead of hot gluing the pin to the alligator clip, hot clue it to a pin backing. Be sure to place the pin in the location you want it to lay as you wear it. I usually put the pin backing towards the top. Now you have your own gorgeous accessory!


Easy Applesauce

 I decided to whip up some applesauce for my babies this morning.

Directions:

1. Cut up an apple into chunks.
2. Then, put them into a bowl and fill the bowl with water.
3. Cook in your microwave about 6 minutes (give or take, I usually stop and check the apples at 3 min). Be careful because the bowl will be hot.
4. Use a hot pad to carry the bowl to your sink (unless you want to save the fresh juice) and pour out the water over a strainer.
5. Put the apple chunks in your food processor or blender and puree.

Voila! You now have homemade applesauce. Let me know your tips and tricks.

Tuesday, January 17, 2012

Jack's Alligator Clips

I finished making a set of hair barrettes and brooches using a favorite fabric of mine. Check out my Etsy shop for your own!


Monday, January 16, 2012

Buffet Cover

I purchased several different kinds of Anna Maria Horner's fabric and decided to make a reversible buffet cover.